This is my first blog post about running anything related to home lab. As I have already done some work before to have Proxmox VE running with connection to the router — I will be explaining that in later posts if I find time or motivation to do so.
Planned:
- I want to have 3 nodes of VM, with Ubuntu Server running on them, referring to them as Swarm Nodes.
- I will be using Ansible past the point when I have a fresh Ubuntu installed (installation will be manual, as this is really complicated to automate for the beginner)
- I will connect swarm nodes with docker swarm
In the future:
- I want to have one more VM node that I’ll be running database in (why not on cluster? generally I find it PITA when doing trying to bootstrap things and have them running correctly so I would like to keep with stateless apps in containers first).
- I will deploy database (will be deciding on postgres/mysql?) on database node.
- I will deploy an interesting app that I found and might be useful to me — paperless.

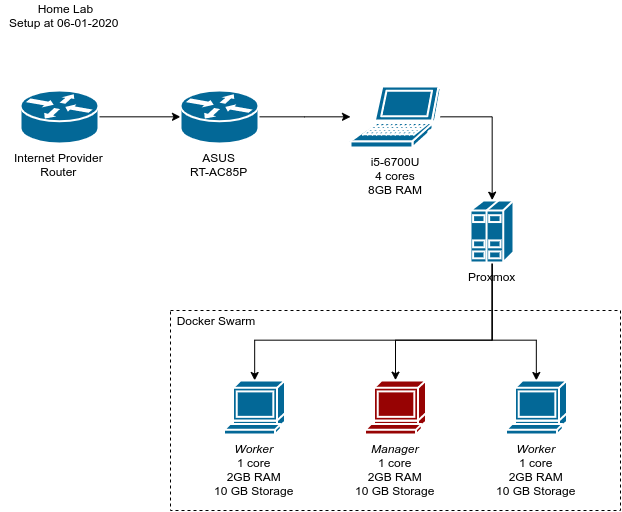
My homelab setup — Lenovo 500S-13ISK-80Q2 running with Intel I5–6700U, 8GB of RAM, dual boot with windows and proxmox based on debian. Connected to OpenWRT based router. In the background BananaPI M1 not connected at all.
Intention of the post
I want to document everything that I was doing with it — not just for sake of doing it — but also to interest anyone out there that wants to try it out to see how easy/hard/interesting can that be. So I will be including the simplest things here that I had in mind when choosing to do one way and not the other.
Creating nodes on Proxmox
Plan is to have 3 nodes, with 2 GB of RAM each and 1 CPU core have them run docker swarm cluster. Why not k8s or k3s or Nomad? Simplicity. I got really overwhelmed with amount of stuff you have to grasp to get them all running, and deploy anything on then that I decided to go with the simplest tool I know and expand out of that. This way I can find out how and why swarm might be limiting me. Or it wouldn’t at all for my use case?
Operating system

To upload an image, I simply choose the local storage on that server which I got by default when installing Proxmox, and upload it via the button.
I choose to go with Ubuntu Server 19.10. Why precisely Ubuntu? I’m familiar with it as it was my main go-to OS when setting up cloud servers at work. Also I lack few things in Debian (like missing sudo). I download image on to my computer, and then upload it to Proxmox via its web interface.
Proxmox by default doesn’t ship with any image at all for virtual machines, so to have anything running you first need to have any image uploaded to its store.
Creating nodes
On the right hand corner of the interface, there are two buttons for creating an instance on Proxmox.
You can either create VM or a CT (Container using LXC). I know that CTs might be easier on the system, but to have docker running inside a CT you have to go through additional setup on the host and I wanted to keep Proxmox supervisor as vanilla as it can be in case I migrate it to a better hardware.
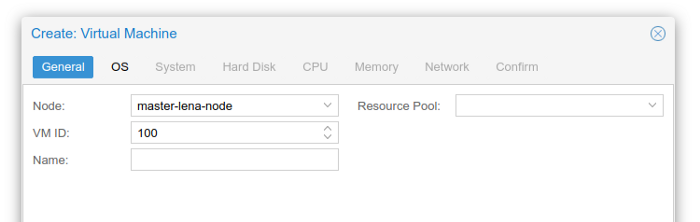
So I choose to create virtual machine. First step is to assign it a name and ID. While ID I will leave to whatever PVE chooses me, the name I want to set something fancy (not some first-try-node-why-lol-it-sucks). For that I will resort to give it a naming schema.
pvevm-<random_generated_name>-node
Where pvevm will stand for ProxmoxVE (this way I will know where this machine even comes from when going through DHCP list on my router), for random generated name I will just use villain names
So the chosen names are:
pvevm-coltontrevil-nodepvevm-mordenwinter-nodepvevm-eukithorblackwood-node
Why so much hassle with the name? Because it will be also used as a hostname for that machine and it will be a lot easier to refer to them via DNS
My router is setup to redirect requests with hostnames to their IP so pvevm-coltontrevil-node.lan will directly translate to its current IP. This way I don’t have to assign static IPs and collide with anything on the network I currently have. Also worth to note here that all nodes that I create are bridged to my current network so they’re visible on the same level as their hypervisor and using same DHCP/DNS server.
Enough about the name, lets move forward.
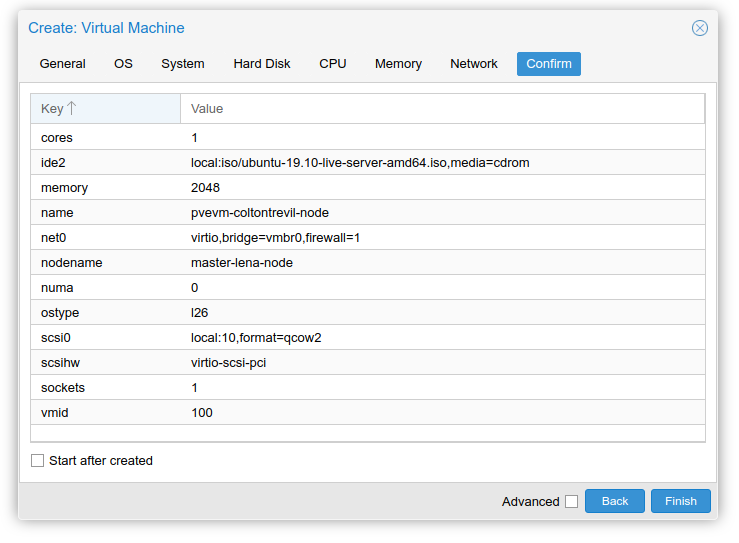
Final result for one of the nodes.
In next tabs I select OS image, one we just uploaded, size of hard disk, which will be for now only 10 GB for each because whole host runs only on 50 GB (an extra challenge lets say). I assign it one core, 2048 MB of RAM, connect it to vmbr0 which is the bridge I mentioned. Rest of the settings I left on default.
Getting nodes running
After creating the nodes, I will just spin them up all at once and connect via VNC to them. Proxmox has noVNC built in that let’s you use VNC in the browser so it will be an easy experience. Only drawback is that you cannot copy and paste to that VNC.
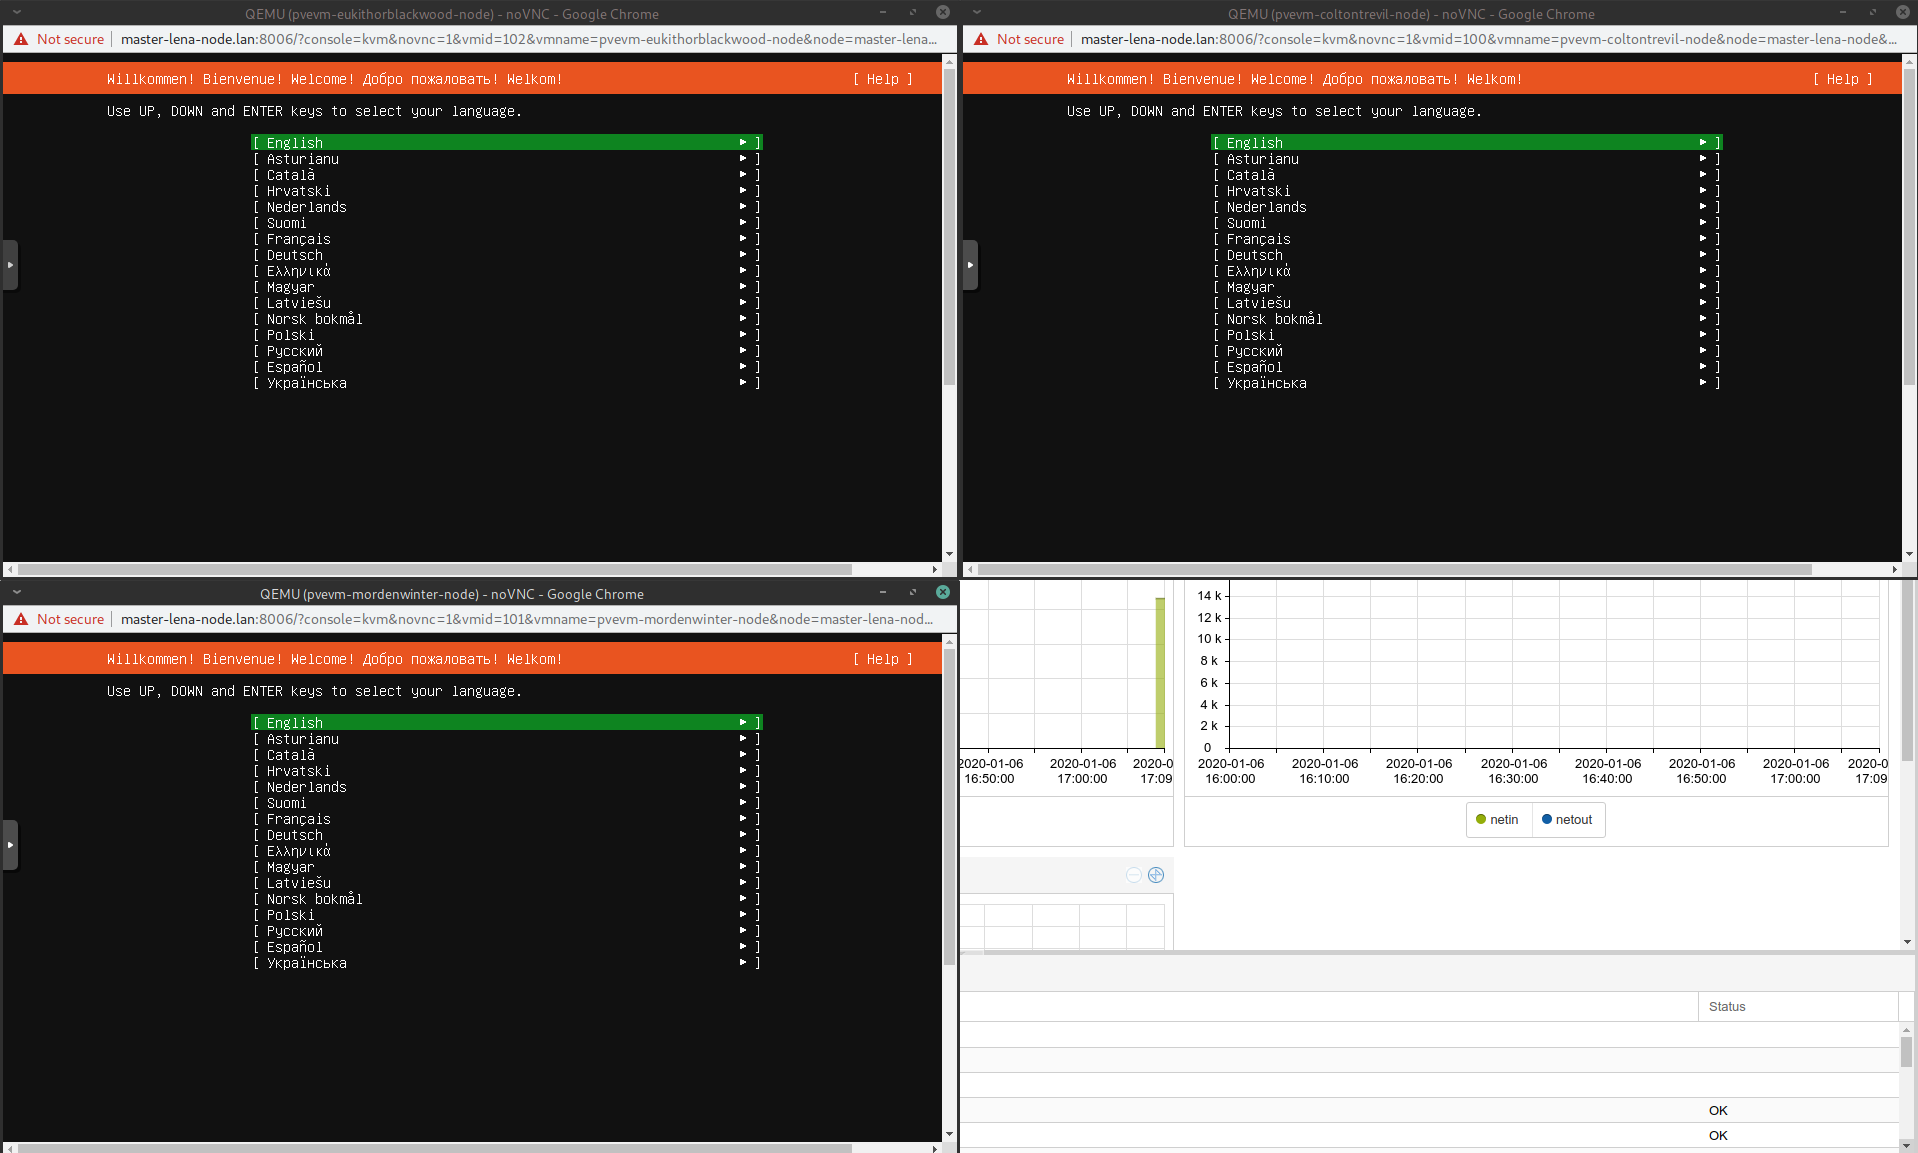
Three nodes up and running with pending installation
While installing I got the notification that there is newer version of the installer — I choose to go with the flow and use the newer one as it proposes.
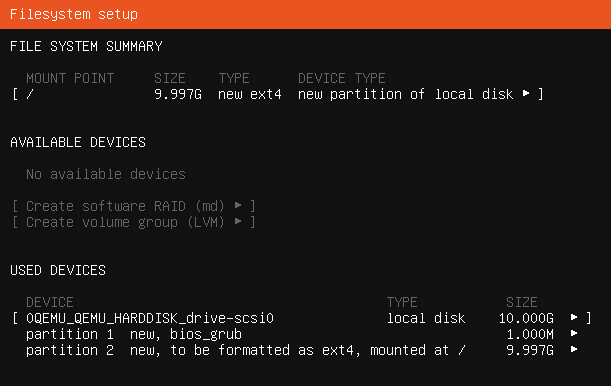
Outcome is the same for all machines — 1 MB for grub, rest for OS.
Standard installation continues — Layout and locale choosing, network interface set up, http proxy, mirror URL, and partitioning. For partitioning I will just use entire disk that was assigned and use automated installation on that disk.
Now to the tricky part that requires more than one second of a thought. I have to specify my name and username. For that I’ll just go with my name abbreviation firstname + first letter of last name. There is also your server’s name which I would like to be the same as the one we assigned it in PVE. Happily I can see the host name at the top of the window, so I just rewrite it for each of the server.
Password can be set to anything, as in next step we will be able to disable login on SSH using it.
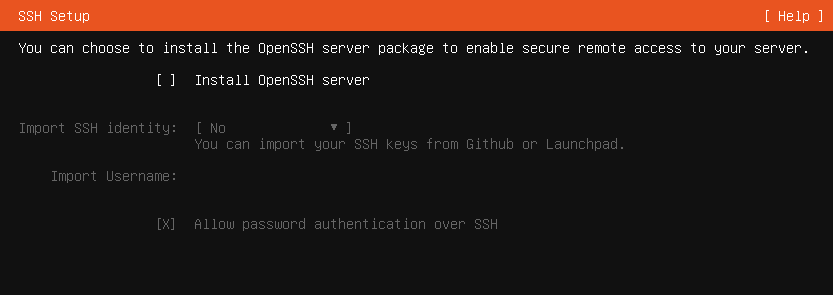
Next monit is about Openssh server — we do want to explicitly enable it — this way after installation we will be in control of it using our desktop tool (terminal, ansible) instead of using VNC.
Also, it seems that you’re able to set up a public key right from this interface by importing it from remote location — that really makes our life easier here.
I will use GitHub source for that, simply adding the ssh key to the profile, or reuse the existing one — and type in your profile name into the field.
Next step asks for installing any of the popular applications — I don’t want to use it since I will be using Ansible in next steps to automate the set-up.
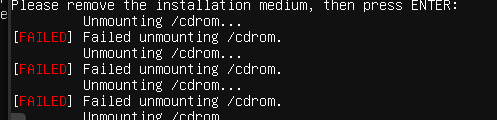
Such a simple thing I’m doing and already some errors
After going through the last step I’m just waiting for installation to complete. For the SSD that I use in that laptop it took me 2 more minutes, after that I’m prompted to reboot the server. Sadly on PVE it fails to unmount the /cdroom after attempting to reboot, so I have to hit the enter again. You can safely ignore these warnings as PVE is set up to use HDD first so the reboot will be right into our freshly installed Ubuntu server.

Ready after approx. 42 seconds each.
Checking if everything went smooth.
For a simple check up I will try to log in using the SSH key which was imported from my GitHub.
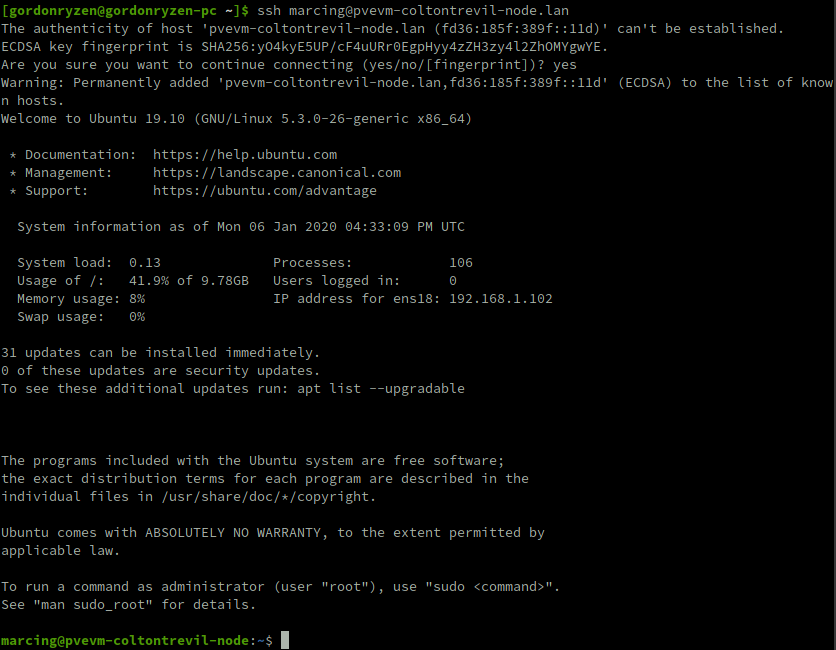
Log in working out of the box using hostname and login set up in the installation
Automation with Ansible
Since we’re setting up a cluster — that means we have to operate on more than one server. Because of it — automation tool is really needed to get anything working since it will take just too much time to do it manually. Thankfully there are simple solutions that you can use to also achieve the automation and that is >ANSIBLE< which is really powerful yet simple tool to setup things at many places at once.
Ansible pre-requirements
To even talk about using Ansible we will be needing it installed on our own computer. Ansible is based on python — and due to that we will be using Python tooling. I specifically use to get it running is:
- pipenv a really painless experience with Python and installing packages.
- VS Code, since there is no real need to get anything better for scripting VS Code is more than enough.
- For best experience install these plugins into your VS Code, taken officially from Ansible page.
And that’s really it.
After you have pipenv installed, to initiate the project use pipenv --three so you’re using the correct python. If you don’t have python 3 installed — just use your own distribution’s package for python3.
Then the only command we need to run is pipenv install ansible — that will get us the newest Ansible installed right into our project. At the time of writing it was 2.9.2, you can also use this specific version by running pipenv install ansible==2.9.2 instead.
Setting up Ansible to operate our cluster
The project structure that I use is as follows
ansible.cfg in root folder:
[defaults]
inventory = ./inventory.yaml
host_key_checking = False
roles_path = ./galaxy-roles/:./roles/

[ssh_connection]
ssh_args = -o ForwardAgent=yes -o ControlMaster=auto -o ControlPersist=60s
inventorypath tells Ansible where to look for for list of our machinesroles_pathpath where Ansible should look for roles (see here as to what are roles). This will be explained later on.- disabled
host_key_checkingsuppresses messages for accepting server fingerprints — just a convenience given we work on known servers.’ [ssh_connection]part sets up agent forwarding which tl;dr lets use your private keys when making ssh connections on the target (for example pulling git repositories on your behalf instead of letting every server to access your repositories). They’re really justsshcommand arguments.
inventory.yaml
pvevm-nodes:
  hosts:
    pvevm-coltontrevil-node.lan:
      ansible_user: marcing
      ansible_python_interpreter: python3
    pvevm-mordenwinter-node.lan:
      ansible_user: marcing
      ansible_python_interpreter: python3
    pvevm-eukithorblackwood-node.lan:
      ansible_user: marcing
      ansible_python_interpreter: python3
Nothing really fancy here — we create a group called pvevm-nodes (remember when I said these names matter?),
give that group list of hosts where key is the host address, and for each host
I’m telling it to use specific user to log in (by default it would be name of my local user),
and to use python3 explicitly on the server (this is what Ansible uses to manage the server).
The interpreter is here explicitly set because we want to be sure we will be using python 3 and not python 2 which might be later in the future thrown out of the system.
And that’s it — we’re ready to operate our cluster using Ansible.
To test it out we can call Ansible ping module on all the nodes.
Important remark: Whenever you want to work in the project — remember to run pipenv shell first this way Ansible will be visible in our terminal (you have to do it each time you want to work in a new terminal window).
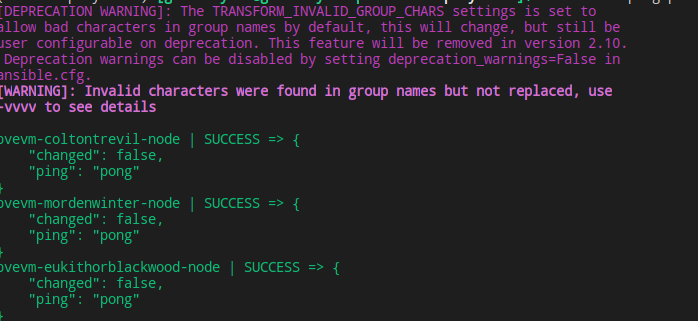
Running ansible -m ping pvevm-nodes we should see above result in our terminal — this means Ansible is able to correctly connect to all the hosts in the group.
Installing docker using Ansible
We don’t have to write all of our playbooks (scripts composed of roles) by ourselves — Ansible has a huge community at galaxy where you can find many roles which will speed up your project. Installing docker is no tricky job so we can use a great docker role created by geerlingguy (I generally recommend all of his roles to get job done).
We’ve set up our roles_path with ./galaxy-roles/ as the first folder —
this is where roles that we install through ansible-galaxy will be stored and read from.
To install the role:
$ ansible-galaxy install geerlingguy.docker
- downloading role 'docker', owned by geerlingguy
- downloading role from [https://github.com/geerlingguy/ansible-role-docker/archive/2.6.0.tar.gz](https://github.com/geerlingguy/ansible-role-docker/archive/2.6.0.tar.gz)
- extracting geerlingguy.docker to /home/gordonryzen/Projects/homelab-project/ansible-playbooks/roles/geerlingguy.docker
- geerlingguy.docker (2.6.0) was installed successfully
If everything went well, you should see that role appear in galaxy-roles directory. Now we need to check up its README to see how to use it (it’s visible both on galaxy site and in the folder that was just created). I’ll leave it up to you to study.
Creating first playbook
Playbook consists of a several things:
- What it should target — host or group of hosts
- roles and their variables (treat variables as function arguments if you’re a programmer, and role as a function to execute on the server)
- tasks (which are specific to this playbook — list of actions to be performed on the server, role is also one of these lists)
And generally this should be enough for us to get the first playbook running.
---
- hosts: pvevm-nodes
  become: yes
  roles:
    - role: geerlingguy.docker
      vars:
        docker_users:
          - marcing
This should be pretty self-explanatory — this playbook consists of a one role, where we pass docker_users variable,
and a list of users which should be added to the group of users that can interact with docker
(see official docker post installation steps as this is mapping of the guide).
There is also mysterious become: yes which basically means that the playbook should be ran as a super user, using default become method (by default sudo).
I saved this playbook as playbooks/pvevm-nodes.yaml and ran this:
$ ansible-playbook playbooks/pvevm-nodes.yaml

PLAY [pvevm-nodes] *************************************************************************************
TASK [Gathering Facts] *********************************************************************************
fatal: [pvevm-eukithorblackwood-node]: FAILED! => {"msg": "Missing sudo password"}
fatal: [pvevm-mordenwinter-node]: FAILED! => {"msg": "Missing sudo password"}
fatal: [pvevm-coltontrevil-node]: FAILED! => {"msg": "Missing sudo password"}
And we approach first issue — it seems we cannot use sudo without providing password by default.
There are two ways to solve this — one is to use -K when calling playbook — this way we can provide password,
or create a role which removes the need for using password when using sudo.
I will go with creating a role since that is always a way to learn something new.
Creating a role for our playbook
We will call this role passwordless-sudo as this will ensure we can use sudo without a password.
Create a structure like this in your roles directory:
└── roles
    └── passwordless-sudo
        └── tasks
            └── main.yaml
Content for main.yamlwill be as follows:
---
- name: Ensure sudo can be ran without password
  lineinfile:
    path: /etc/sudoers
    regexp: "^{{user}} "
    line: "{{user}} ALL=(ALL) NOPASSWD:ALL"
    backup: yes
To explain what happened here, have documentation for lineinfile open side by side:
backup: yesbacks up our file in case anything goes wrongpath: /etc/sudoersis the file we have to edit to make passwordless sudo possible.line: “{{user}} ALL=(ALL) NOPASSWD:ALL"is using our invented variableuserwhich we will provide in playbook to specify which user we mean to make passwordless sudo (generally this will allow us to use this role for any user ever).regexp: “^{{user}} “lineinfile works in a way that it uses regex to find a first matching line, and checks whether its content is what we provided inline— if that is not the case — it will edit that line to match it. If there is no such line — it will add it by the end. This way subsequent runs of this action will not add any more lines to that file,
and if someone edits it changing for example fromALL=(ALL)to something else — it will get updated back to this value. This ensures our playbooks are idempotent.
Now we can go back to our playbook, and put the following code in it:
---
- hosts: pvevm-nodes
  become: yes
  roles:
    - role: passwordless-sudo
      vars:
        user: marcing
I will just run passwordless-sudo role to see if it works correctly,
and then add back the docker role we had there. Let’s run our playbook,
this time with -K since we have no other way (other than providing the password in inventory) to make it run.
$ ansible-playbook playbooks/pvevm-nodes.yaml -K
BECOME password: PLAY [pvevm-nodes] ***************

TASK [Gathering Facts] **********************
ok: [pvevm-eukithorblackwood-node]
ok: [pvevm-coltontrevil-node]
ok: [pvevm-mordenwinter-node]

TASK [passwordless-sudo : Ensure sudo can be ran without password] *************************************
changed: [pvevm-coltontrevil-node]
changed: [pvevm-mordenwinter-node]
changed: [pvevm-eukithorblackwood-node]

PLAY RECAP *********************
pvevm-coltontrevil-node    : ok=2    changed=1    unreachable=0    failed=0    skipped=0    rescued=0    ignored=0
pvevm-eukithorblackwood-node : ok=2    changed=1    unreachable=0    failed=0    skipped=0    rescued=0    ignored=0
pvevm-mordenwinter-node    : ok=2    changed=1    unreachable=0    failed=0    skipped=0    rescued=0    ignored=0
We see that running it made a change on all 3 hosts to add the line to the file. Now if we were to run the same role again — the same task would tell us “ok” instead of “changed” — that means no change was necessary since server is already configured.
We will add back the docker role and run it again, role will look like so:
---
- hosts: pvevm-nodes
  become: yes
  roles:
    - role: passwordless-sudo
      vars:
        user: marcing
    - role: geerlingguy.docker
      vars:
        docker_users:
          - marcing
And the command is again the same, but without -K now:
$ ansible-playbook playbooks/pvevm-nodes.yaml
<I will cut the data to not make this too big>
TASK [passwordless-sudo : Ensure sudo can be ran without password] *************************************
ok: [pvevm-eukithorblackwood-node]
ok: [pvevm-coltontrevil-node]
ok: [pvevm-mordenwinter-node]
[......]
TASK [geerlingguy.docker : Add Docker repository.] *****************************************************
fatal: [pvevm-mordenwinter-node]: FAILED! => {"changed": false, "msg": "apt cache update failed"}
fatal: [pvevm-coltontrevil-node]: FAILED! => {"changed": false, "msg": "apt cache update failed"}
fatal: [pvevm-eukithorblackwood-node]: FAILED! => {"changed": false, "msg": "apt cache update failed"}
Another issue occurred, this time we just get some error which tells us nothing,
but we can rerun the playbook with -vvv to get more output to narrow down the problem
(be warned: this will throw lots of data on the screen)
[....]
"invocation": {
        "module_args": {
            "codename": null,
            "filename": null,
            "install_python_apt": true,
            "mode": null,
            "repo": "deb [arch=amd64] [https://download.docker.com/linux/ubuntu](https://download.docker.com/linux/ubuntu) eoan stable",
[....]
Looks like it errors on adding docker apt repository, quick google tells that this is a common issue because we choose to go with newest available Ubuntu (19.10) which is not yet supported. Another link provided in github says docker.io should be used instead. And I said I wanted to go easy route huh?
The simplest solution here is to just force our role to use disco (19.04) packages instead for docker, and that’s what we’re going to do.
We can see in galaxy-roles/geerlingguy.docker/defaults/main.yml that the apt path is provided as follows:
docker_apt_repository: "deb [arch={{ docker_apt_arch }}] [https://download.docker.com/linux/{{](https://download.docker.com/linux/{{) ansible_distribution|lower }} {{ ansible_distribution_release }} {{ docker_apt_release_channel }}"
We can just replace ansible_distribution_release for this role to be something else,
for that we can just provide another var for a role where we set this to disco .
---
- hosts: pvevm-nodes
  become: yes
  roles:
    - role: passwordless-sudo
      vars:
        user: marcing
    - role: geerlingguy.docker
      vars:
        ansible_distribution_release: "disco"
        docker_users:
          - marcing
Running this again makes it look like we solved the issue and installation continued. By the end we should get information similar to this:
PLAY RECAP *********************************************************************************************
pvevm-coltontrevil-node    : ok=15   changed=5    unreachable=0    failed=0    skipped=4    rescued=0    ignored=0
pvevm-eukithorblackwood-node : ok=15   changed=5    unreachable=0    failed=0    skipped=4    rescued=0    ignored=0
pvevm-mordenwinter-node    : ok=15   changed=5    unreachable=0    failed=0    skipped=4    rescued=0    ignored=0
No failed tasks mean it worked correctly. To see if docker works correctly we can call on each host a hello world command:
$ ansible pvevm-nodes -a "docker run hello-world"

pvevm-coltontrevil-node | CHANGED | rc=0 >>Hello from Docker!
...
pvevm-mordenwinter-node | CHANGED | rc=0 >>Hello from Docker!
...
pvevm-eukithorblackwood-node | CHANGED | rc=0 >>Hello from Docker!
...
It means that every one of our servers can happily run hello-world container and docker functionality is more or less working correctly on them.
Creating docker swarm
For that we could use a galaxy role, but the only sufficiently good enough I found was also trying to install docker again which sounds too complicated and might conflict with role we just used.
So instead we will follow the tutorial of docker on swarm and recreate the steps in Ansible roles.
To create a swarm cluster, we need to define manager and workers,
for that we will need to modify our inventory a little to distinguish between manager and workers.
We need to append to pvevm-nodes following code, just after the hosts on second level:
 children:
    pvevm-nodes-workers:
      hosts:
        pvevm-coltontrevil-node.lan:
        pvevm-mordenwinter-node.lan:
    pvevm-nodes-manager:
      hosts:
        pvevm-eukithorblackwood-node.lan:
This will make colton and morden workers, and eukithor manager.
Swarm role
Role will base on ability to delegate specific actions to another server. We will be doing following schema
- Create a leader on leader nodes (customizable as to what are leader nodes through variable)
- Copy leader token
- Join worker nodes using leader token
- We don’t want to run this if there already is a leader (extra points for running this only for servers which didn’t join yet)
- We will verify manually if cluster was correctly created (extra points for doing it at the end of the whole role)
roles
    ├── docker-swarm
        └── tasks
            ├── main.yaml
            ├── manager-tasks.yaml
            └── worker-tasks.yaml
Following structure of the task is assumed, we will be going step by step to see how the role got created.
annotation: I’ve spend almost an hour figuring out this role, so writing it down would take even more, but the final solution is what I’m somehow happy with
main.yml
---
- name: Run manager tasks
  include_tasks: manager-tasks.yaml
  run_once: yes
  loop: "{{ groups[manager_nodes] }}"
- name: Run worker tasks
  include_tasks: worker-tasks.yaml
  run_once: yes
  loop: "{{ groups[worker_nodes] }}"
This is looping through two variables that are provided externally — manager_nodes and worker_nodes.
run_once: yesmakes a single task for a given loop iteration be ran only once for the first server. This is not necessary but cleans a bit the output (because later on you will see on how we useddelegate_toto split out the actions)loop: {{}}runs through a list which is pulled out of inventory by operator provided name. In our caseworker_nodes=pvevm-nodes-workersandmanager_nodes=pvevm-nodes-manager(2 worker nodes, one manager node, but it is a list of one element so that’s why looping anyway)
Creating a leader
Creating a leader is placed within manager-tasks.yaml, with the following content
- name: "Set facts"
  set_fact:
    advertise_addr: '{{ hostvars[item]["ansible_default_ipv4"]["address"] }}'
- name: "Check if leader was already elected"
  delegate_to: "{{item}}"
  command: docker info
  register: docker_info
- name: "Make selected node a leader"
  delegate_to: "{{item}}"
  delegate_facts: yes
  command: docker swarm init --advertise-addr {{ advertise_addr }} --listen-addr {{ advertise_addr }}
  when: 'docker_info.stdout is not search("Is Manager: true")'
- name: "Get worker join token"
  delegate_to: "{{item}}"
  delegate_facts: yes
  command: docker swarm join-token worker -q
  register: worker_join_token- name: "Set worker join token fact"
  set_fact:
    worker_join_token: "{{worker_join_token.stdout}}"
First action is to just assign an address of leader to the shorter variable name.
This hack was needed instead of just using ansible_default_ipv4 because when delegating,
this variable is actually equal to machine on which behalf we delegated the task for, and not of which machine it was actually running.
All delegate_to just tells which server it should be running on (where item is iterated from loop in main.yaml ).
Rest of it is pretty self explanatory — we run swarm init, only when this node is not manager already,
and we get the token using -q flag so we get pure token in worker_join_token.stdout variable instead of some noise that init outputs.
We then assign it as a global fact to be used in second set of tasks.
Joining workers
This one is really simple worker-tasks.yaml
- name: "Set facts about join address"
  set_fact:
    join_address: '{{hostvars[groups[manager_nodes].0]["ansible_default_ipv4"]["address"]}}'
- name: "Check if workers are already part of swarm"
  delegate_to: "{{ item }}"
  command: docker info
  register: docker_info_worker
- name: "Join workers"
  delegate_to: "{{ item }}"
  command: docker swarm join --token {{worker_join_token}} {{join_address}}
  when: 'docker_info_worker.stdout is not search("Swarm: active")'
In the first step I set join_address as an alias to first ipv4 address of the manager_nodes.
I know it is plural, but I use it as singular anyway here. Don’t burn me yet for this.
We also again pull the info from docker info about the state of the node, because we cannot join it twice to same cluster,
and if it is not joined we just call docker swarm join
Verifying if swarm works
We will use an example from docker site, and create hello world service that will ping docker.com.
Warning: this command must be run on manager, not on the workers.
$ docker service create --replicas 1 --name helloworld2 alpine ping docker.com
jcs85egp6ophc0fqnwyhmqjn9
overall progress: 1 out of 1 tasks
1/1: running   [==================================================>]
verify: Service converged
Since I already had service of helloworld ran, I got now two services, lets see where they got replicated.

Swarm is working — we created two services and they got balanced on the worker nodes
Wrap up
If you made it to the end — congratulations, because this is my first blog post and if it was any interesting to you leave me a comment to cheer me up. Writing this post itself made me actually do a lot to know what I wanted to do in the end. And it made a nice way to keep me motivated to finish it (since I wanted to have it finished not left halfway through!)
While the Ansible playbook that I wrote could have been a lot better — this gives a nice overview through what you need to go through to actually have a simple swarm running from almost literally a ground up.
Overview of what was achieved
I might go into another post on how to have an application running on it — but until then see you soon